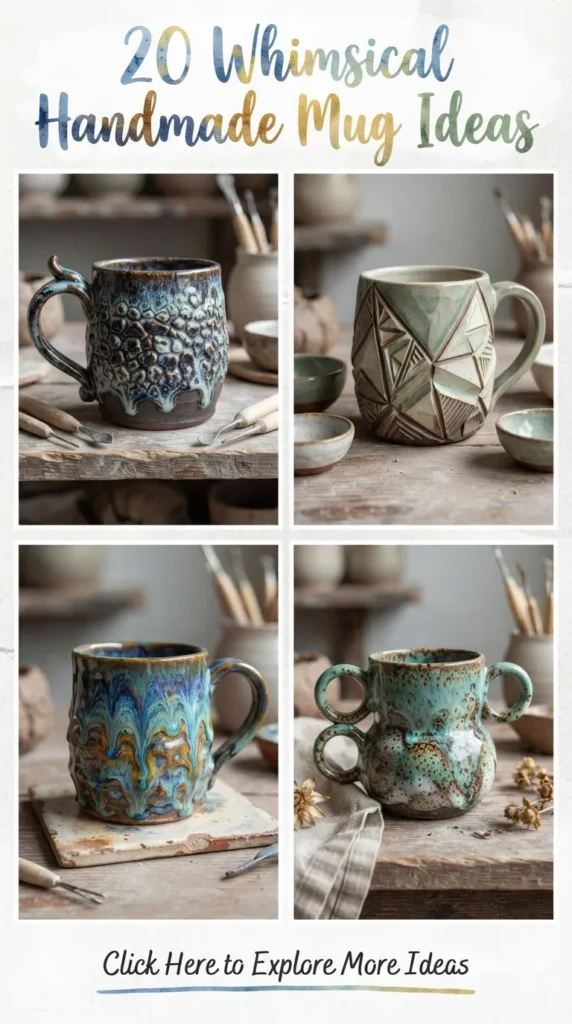
There is something undeniably magical about holding a handmade mug. Unlike mass-produced ceramic cups that line department store shelves, a custom, handcrafted vessel carries personality, warmth, and artistic intention. When you wrap your hands around a piece of pottery that features tactile textures, playful sculpted details, or surreal glaze drips, your morning coffee or evening tea transforms from a routine habit into a mindful ritual.
Whimsical pottery has taken the crafting and interior decor world by storm. People are moving away from minimalist gray aesthetic dishes and embracing cozy, storybook-inspired designs. Whether you are an experienced ceramic artist looking for fresh studio inspiration, a polymer clay enthusiast decorating plain stoneware, or a beginner experimenting with air-dry clay for display pieces, crafting whimsical mugs offers endless creative freedom.
Below are 20 uniquely imaginative, realistic, and Pinterest-worthy handmade mug ideas. Each section breaks down the concept, step-by-step creation methods, expert tips, variations, and critical mistakes to avoid so your creations remain durable, safe, and gorgeous.


1. The Enchanted Cottagecore Mushroom Mug
What This Idea Means
This design brings the nostalgic beauty of a fairytale forest straight to your breakfast table. It features a sculpted red cap with raised white polka dots forming a lid or brim, while the body of the mug mimics a speckled fungal stalk surrounded by tiny sculpted moss patches.
How to Make It
- Base Shaping: Throw or hand-build a slightly bulbous cylindrical mug body using a warm, speckled cream clay body.
- Sculpting the Details: Roll small coils of clay to create tiny wild mushrooms and delicate moss clusters around the base. Attach them firmly using the scratch-and-score method with clay slip.
- The Handle: Mold the handle to resemble a bent tree branch or a thick mushroom stem with tiny gills grooved along the underside.
- Glaze & Finish: Underglaze the cap in rich crimson red, leave the dots bare white or paint them with opaque white glaze, and coat the main body in a soft satin matte clear or light sage green glaze.
Tips & Variations
- Tip: Ensure the lid (if making a mushroom cap cover) has a small inner lip so it fits securely without sliding off when bumped.
- Variation: Try a brown toadstool theme using deep umber glazes and glossy cream spots for a darker, moody forest vibe.
Things to Avoid: Do not make the sculpted mushrooms on the body protrude too far near the rim where your lips touch, as this makes drinking uncomfortable. Avoid leaving air pockets inside thick clay attachments like the mushroom cap, or they will explode during firing.
2. Drip-and-Ooze Pastel Monster Mug
What This Idea Means
A playful, slightly silly design featuring cheeky sculpted monster eyes, vibrant pastel colors, and exaggerated glaze “drips” running down the sides. It balances cute and spooky, making it an instant hit for custom pottery collections.
How to Make It
- Forming the Mug: Sculpt a basic mug body with a wide base to give your character a sturdy foundation.
- Adding Facial Features: Hand-sculpt one, two, or three large cartoonish eyeballs onto the front surface. Add tiny horn studs near the top rim if desired.
- Applying Glaze: Paint the body in a soft pastel lavender or mint green underglaze. Apply a thick, melting glaze (like a heavy white or baby pink glaze) generously near the rim.
- Firing: Fire to the glaze’s optimal temperature so the top layer melts into thick, smooth tears down the face without running onto the kiln shelf.
Tips & Variations
- Tip: Use a glaze catcher slab underneath during firing to save your kiln shelves from adventurous glazes.
- Variation: Make a Halloween edition using matte black for the body and bright neon green or blood-orange glossy drips.
Things to Avoid: Avoid putting high-relief features right next to the handle where your fingers need space to hold the mug. Never apply thick melting glazes all the way to the bottom edge, or the mug will fuse to the kiln floor.
3. Celestial Starry Night Moon Phase Mug
What This Idea Means
Inspired by the night sky, this concept blends dark, cosmic glaze work with tactile gold luster moon phases and carved constellation lines. It feels luxurious, mystifying, and deeply calming.
How to Make It
- Carving the Clay: While the leather-hard clay mug is on the wheel or slab, use a carving tool to trace crescent moons, full moons, and fine lines connecting tiny stars.
- Base Color: Apply a rich midnight blue, cobalt, or deep matte black glaze across the exterior.
- Glaze Firing: Fire the ceramic piece to high temperature to seal the base color.
- Luster Application: Paint bright liquid gold or platinum luster over the carved moon phases and star accents, then perform a low-temperature third firing to permanently bond the metallic shine.
Tips & Variations
- Tip: Use fine carving loop tools to keep constellation lines crisp so glaze doesn’t swamp the subtle details.
- Variation: Swap gold for iridescent pearl glaze if you prefer a subtle, shimmering moonlight effect.
Things to Avoid: Do not microwave mugs that feature real metallic lusters (like gold or silver), as the metal will spark. Avoid applying thick glaze over delicate carved lines, which will wash out the constellation details.
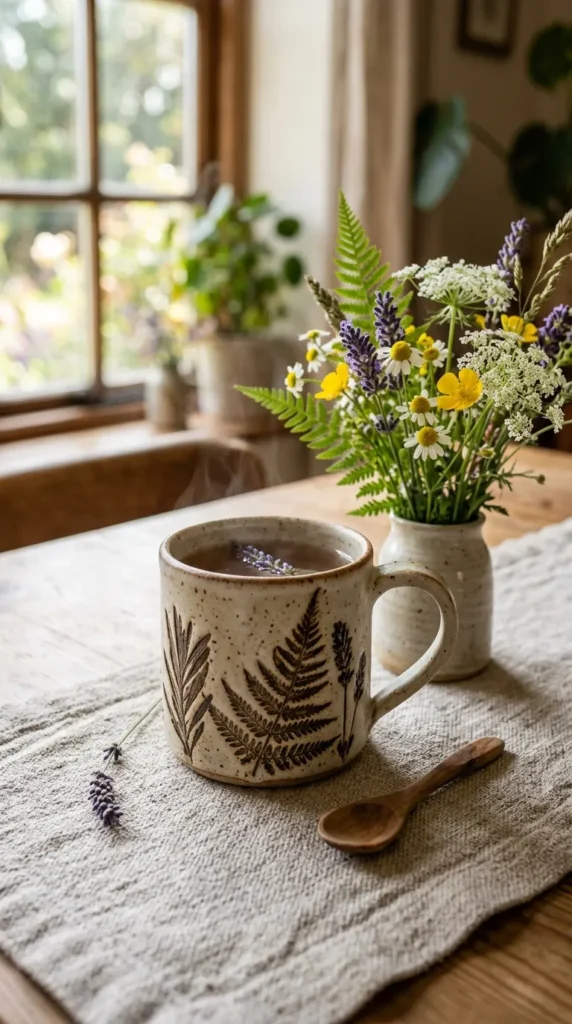
4. Vintage Pressed Wildflower & Botanical Stamp Mug
What This Idea Means
This style captures the quiet elegance of an antique herbalist’s journal. Real dried botanical elements or ceramic stamps are pressed into raw clay to leave crisp, intricate organic impressions that hold glaze beautifully.
How to Make It
- Slab Preparation: Roll out a smooth slab of stoneware clay. Place sturdy wild ferns, lavender sprigs, or carved wooden stamps directly onto the clay surface.
- Rolling the Texture: Gently roll over the plants with a wooden rolling pin to leave crisp impressions, then carefully peel the botanical material away.
- Forming: Construct the mug body from the textured slab, ensuring the seam line blends smoothly into the design.
- Washing with Stain: After bisquefiring, brush a dark iron oxide or dark brown underglaze wash into the impressions, then wipe the surface clean with a damp sponge so color remains only in the recessed lines.
Tips & Variations
- Tip: Leaves with thick, prominent veins (like fern fronds or sage) leave much cleaner clay imprints than thin flowers.
- Variation: Color individual flower petals after wiping back the dark wash using translucent underglaze watercolors.
Things to Avoid: Do not leave organic leaves inside the clay when forming; peel them out before the clay dries, or they will leave messy rot residue. Don’t use a sponge that is dripping wet when wiping back the wash, as it will pull paint out of the deep grooves.
5. Cozy Cable-Knit Sweater Texture Mug
What This Idea Means
Designed to resemble your favorite winter knitwear, this mug has a deep, tactile pattern of braided yarn and ribbed trim wrapped around its exterior, bringing instant warmth to cold winter mornings.
How to Make It
- Texture Transfer: Use a textured silicone mat or hand-sculpt thin clay coils into braided cable patterns. Press these firmly onto a leather-hard mug body.
- Rim and Base Details: Add a ribbed band near the top rim and bottom base to mimic the cuffs of a sweater sleeve.
- Soft Glazing: Use a translucent, soft-colored glaze—such as cream, dusty rose, or sky blue—that pool slightly in the deep textures and breaks lighter over high ridges.
Tips & Variations
- Tip: Spray a tiny mist of water before pressing silicone texture mats onto leather-hard clay to prevent sticking.
- Variation: Paint a matte sweater finish on the outside while keeping the interior glossy for easy washing.
Things to Avoid: Avoid making the sweater texture overly sharp or abrasive to the touch; smooth down any rough clay crumbs before bisquefiring. Do not leave the interior textured, or coffee stains will be almost impossible to scrub clean.



6. Sculpted Pet Portrait Hugger Mug
What This Idea Means
A sweet, heartwarming concept where a 3D sculpted head of a dog, cat, or rabbit peeks over the front rim of the mug, while two tiny paws loop around the side as if holding on for dear life.
How to Make It
- Building the Base: Create a sturdy, thick-walled cylindrical mug to support the weight of the additions.
- Sculpting the Face: Hand-sculpt your chosen animal’s face separately using clay, ensuring the back is contoured to flushly fit the curve of the mug rim.
- Attaching: Score both surfaces thoroughly, apply slip, and blend the animal form securely into the rim and outer wall. Add tiny paws near the middle.
- Underglaze Detailing: Hand-paint realistic fur textures, eyes, and small nose details using fine liner brushes and underglaze paints before applying a clear gloss coat.
Tips & Variations
- Tip: Keep the animal head lightweight by hollowed out the back slightly so it doesn’t cause the mug wall to slump outward in the kiln.
- Variation: Sculpt a sleeping cat coiled around the base of the mug instead of hanging from the top rim.
Things to Avoid: Do not place the pet’s head directly on or near the handle side where it interferes with your hand when lifting the mug. Avoid sharp clay fur points that could snag during handling or chip off easily.
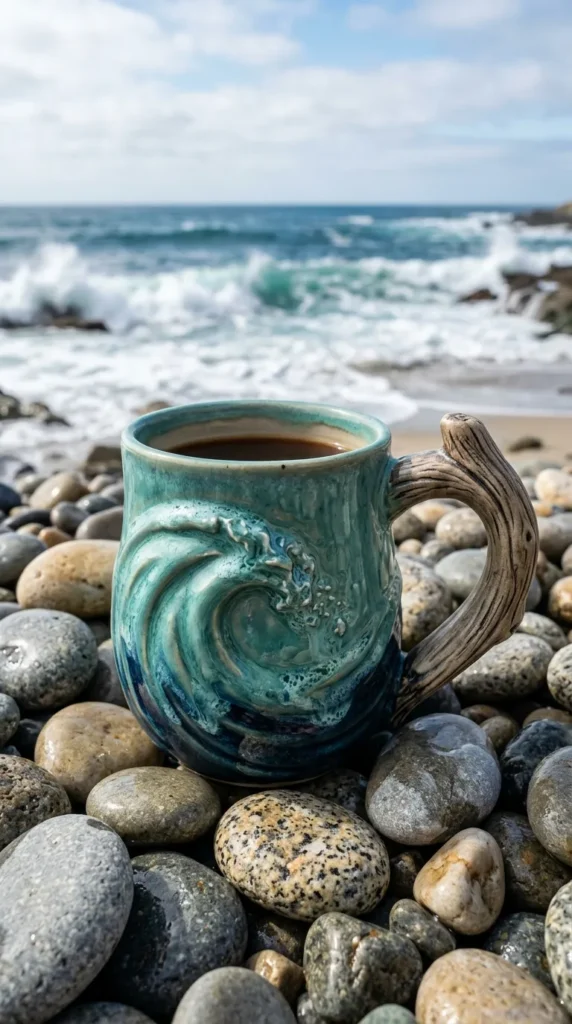
7. Ocean Wave & Driftwood Sea Mug
What This Idea Means
Capturing coastal tranquility, this mug pairs textured, swirling turquoise glazes that mimic foaming ocean waves with a sculpted handle that looks like weathered seaside driftwood.
How to Make It
- Hand-Sculpting the Handle: Model a thick, rustic handle with deep ridges, wood grain textures, and tiny knot holes to look like natural beach driftwood.
- Carving Waves: Carve flowing, overlapping cresting wave lines onto the bottom half of the mug cylinder.
- Glaze Layering: Apply an iron-rich matte brown glaze to the handle. On the body, layer a deep navy blue glaze at the base, topped with reactive turquoise and a drippy white glaze along the wave crests.
- Firing: High-fire so the glazes run together and create natural sea foam effects.
Tips & Variations
- Tip: Use reactive flux glazes along the wave tops to make glaze colors melt into realistic frothy bubbles.
- Variation: Embed tiny, hand-sculpted clay barnacles or sea shells near the base for extra coastal texture.
Things to Avoid: Avoid making the handle texture too rough, as wood grain lines can become uncomfortable to hold if edges aren’t smoothed out before firing. Do not over-apply reactive glazes near the foot ring to prevent runny drips on your kiln shelf.
8. Whimsical Ceramic Beehive & Honeycomb Mug
What This Idea Means
Bright, happy, and charming, this design features an embossed geometric honeycomb pattern on the body, glossy honey glaze drips, and a tiny sculpted bumblebee resting near the handle.
How to Make It
- Honeycomb Stamping: Use a hexagonal rubber stamp or roller tool to imprint an even honeycomb grid across the lower two-thirds of the clay mug wall.
- Bee Sculpting: Roll a small oval of clay, carve fine wing lines, and attach it near the upper rim or onto the handle top.
- Glaze Detailing: Apply a warm honey-amber transparent glaze over the honeycomb section. Paint yellow and black underglaze stripes onto the bee, adding a touch of white for translucent wings.
- Drip Effect: Dab thick golden-yellow glaze along the upper rim so it appears to ooze naturally into the honeycomb grooves.
Tips & Variations
- Tip: Wipe back a dark underglaze from the hexagon ridges so the geometric pattern pops before laying down translucent yellow glaze.
- Variation: Add small sculpted white clover blossoms around the bottom base to complete the garden theme.
Things to Avoid: Avoid placing the 3D bumblebee right where your thumb sits on the handle. Do not let the yellow honey drip glaze get so thick that it creates brittle glass bubbles that can flake off during use.
9. Terrazzo Confetti Stoneware Mug
What This Idea Means
A mid-century modern artistic concept that uses colorful specks of recycled ceramic clay body fragments (grog/grog flakes) embedded into light stone clay, creating a playful mosaic confetti look.
How to Make It
- Preparing Clay Clays: Crush dried bits of colored clay (pastel pink, teal, mustard, mustard, ochre) into small, irregular pebble-sized fragments.
- Kneading & Rolling: Wedge these colorful fragments directly into a light cream or white stoneware clay body.
- Forming: Roll out slabs or throw the confetti-speckled clay on the pottery wheel. The process will reveal scattered shapes naturally along the surface.
- Finishing: Sand the leather-hard clay smooth to flush out any protruding chips. Apply a satin matte or crystal-clear glaze to lock in the terrazzo look.
Tips & Variations
- Tip: Make sure all colored clay fragments share the same thermal expansion contraction rate as your base clay body to prevent cracking.
- Variation: Use geometric ceramic decals on a plain white mug body if you want precise, razor-sharp modern confetti shapes instead of raw clay fragments.
Things to Avoid: Avoid leaving sharp edges on protruding clay chips; sand the surface thoroughly before the bisque fire. Do not use dark base clay bodies, or the colorful terrazzo fragments won’t contrast cleanly.
10. Moody Dark Academia Stacked Books Mug
What This Idea Means
Perfect for literature lovers and cozy night readers, this mug is hand-sculpted to resemble a stack of vintage, leather-bound books piled on top of each other, with a bookmark acting as a handle.
How to Make It
- Constructing Book Layers: Slab-build three or four wide, flat rectangular rings, stack them slightly offset, and weld them together into a hollow cylinder.
- Carving Page & Spine Texture: Use a fine needle tool to carve thin horizontal lines along the sides to look like paper book pages. Carve spine seams and corner guards onto the outer spine sides.
- Handle Attachment: Sculpt a flat, ribbon-like clay strip that loops out from the top book down to the bottom book, mimicking a classic ribbon bookmark.
- Glaze Treatment: Underglaze the spine covers in deep forest green, burgundy, and dark navy. Apply a light sepia or antique brown wash over the “pages” section.
Tips & Variations
- Tip: Add gold luster detailing to the spines for book titles or decorative cover scrollwork after the main glaze fire.
- Variation: Sculpt an open book on one side of the mug where you can hand-write a favorite literary quote using ceramic underglaze pens.
Things to Avoid: Avoid making the rectangular shape too squarish on the inside, as sharp interior corners are difficult to clean. Ensure the bookmark handle is thick enough to bear the weight of a full cup of liquid.



11. Retro Strawberry Patch & Blossom Mug
What This Idea Means
A cheerful, nostalgic style inspired by 1970s kitchenware. It features plump, 3D relief strawberries, tiny white blossoms with yellow centers, and vibrant green leafy vines climbing around the exterior.
How to Make It
- Sculpting Fruits: Hand-sculpt small half-strawberry shapes and poke tiny seed dimples across their surfaces using a wooden stylus.
- Vines and Leaves: Roll delicate clay coils for vines and cut out tiny leaf shapes. Score and attach fruits, leaves, and vines around the mug body.
- Coloring: Paint the ripe strawberries with bright glossy red underglaze, leaves with emerald green, and flowers with crisp opaque white.
- Base Glaze: Keep the background clay natural speckled cream or glaze it in a soft milk-white finish.
Tips & Variations
- Tip: Use a clear glaze over the painted fruits so their bright colors pop vivid and glossy against a matte mug base.
- Variation: Switch strawberries for juicy cherries, lemons, or peaches depending on your favorite seasonal fruit.
Things to Avoid: Avoid attaching the strawberry elements too high near the drinking lip. Ensure all small vine coils are thoroughly scored and welded to the main body so they don’t break off during daily dishwashing.
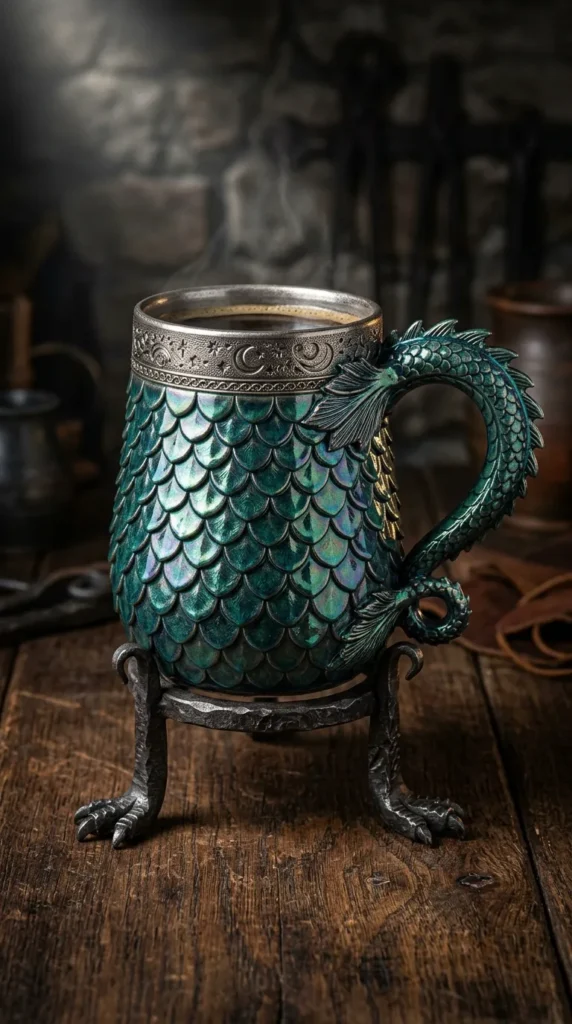
12. Celestial Dragon Scale Textured Mug
What This Idea Means
A fantasy-inspired concept featuring overlapping, hand-carved or stamped dragon scales coated in iridescent or metallic glazes that catch the light like mythical armor.
How to Make It
- Scale Stamping/Carving: Starting from the base of a leather-hard cylinder, use a curved semi-circle punch or teardrop tool to stamp overlapping scale layers all the way to the top rim.
- Handle Styling: Shape the handle like a dragon’s curved tail, complete with subtle ridges along the spine.
- Glaze Application: Apply a dark base coat underglaze (like black or dark purple). Spray or brush high-fire metallic or iridescent glazes (like peacock green or oil-spot bronze) over the scales.
- Firing: Fire to high temperature where glazes pool inside scale crevices and break bright over the raised edges.
Tips & Variations
- Tip: Layering two different glaze colors (a dark base and a lighter breaking glaze) will make the scale depth look dramatic and 3D.
- Variation: Paint subtle gold luster tips on every third scale for a royal, majestic dragon look.
Things to Avoid: Avoid leaving sharp or pointed edges on individual scale tips that could poke your fingers while holding the mug. Do not apply glaze too heavily, or it will puddle and completely fill in the delicate scale outlines.
13. Abstract Marble & Liquid Gold Kintsugi Mug
What This Idea Means
Drawing inspiration from the traditional Japanese art of Kintsugi (repairing broken pottery with gold), this elegant mug mixes marbled colored clays with painted veins of bright gold luster across the surface.
How to Make It
- Marbling Clay: Combine two contrasting clay bodies (such as dark charcoal stoneware and pure white porcelain). Lightly wedge them together just enough to create flowing marble swirls without blending them into a solid color.
- Forming: Throw or slab-build the mug form carefully so you don’t smear the surface swirl pattern.
- Glaze Firing: Bisque fire, apply a smooth clear gloss glaze, and fire to final glaze temperature.
- Luster Accents: Trace fine, organic cracks across the marble patterns using gold liquid luster paint, then fire a third time in the kiln to set the gold.
Tips & Variations
- Tip: Keep clay wedging minimal; over-wedging marble clay turns your beautiful swirls into a dull, muddy gray color.
- Variation: Instead of marbled clay, use a single dark satin matte black mug and paint thin, delicate metallic gold rivers across the dark canvas.
Things to Avoid: Never use real Kintsugi epoxy resin or non-food-safe glues on drinking surfaces; use food-safe ceramic glazes and professional ceramic lusters instead. Do not microwave due to the real metal gold accents.
14. Cute Woodland Fox Hug Mug
What This Idea Means
An adorable, cozy mug shaped like a curled-up forest fox. The fox’s bushy tail sweeps around the side to form an ergonomic handle, while its sleeping face is softly painted on the front.
How to Make It
- Base Body: Sculpt a slightly tapered, rounded clay vessel with a cozy, hand-warming shape.
- Tail Handle: Roll a thick clay coil, taper it towards the end, and carve subtle fur lines into it. Curve it from the base up to the rim to form a sturdy, comfortable handle.
- Facial Sculpting: Gently pinch out a subtle fox snout and small pointed ears along the upper front rim.
- Painting: Use warm terracotta-orange underglazes for the coat, pure white for the cheeks and tail tip, and fine black lines for closed, sleeping eyes.
Tips & Variations
- Tip: Keep the tail handle thick at both connection points so it feels comfortable and balanced when supporting a full cup of tea.
- Variation: Adapt the same form into a brown bear, polar bear, or sleepy raccoon by altering the ear shapes and paint colors.
Things to Avoid: Avoid making fox ears sharp or protruding too far above the rim where they could break easily or catch your nose while drinking. Do not skip scoring when attaching the thick tail handle.
15. Vibrant Mexican Talavera Style Floral Mug
What This Idea Means
A bright, energetic, and artistic design inspired by historic Mexican Talavera pottery. It showcases bold relief floral patterns, intricate scrollwork, and contrasting high-gloss jewel tones.
How to Make It
- Relief Slip Tracing: Using a squeeze bottle filled with thick clay slip, pipe raised floral outlines, leaves, and geometric borders directly onto a smooth clay mug surface.
- Bisque Firing: Fire the piece to set the raised slip lines.
- Detailed Glaze Painting: Meticulously hand-paint between the raised slip borders using vibrant underglazes: cobalt blue, sun yellow, emerald green, and deep orange.
- Clear Glaze Finish: Coat the entire mug in a crystal-clear glossy dipping glaze and fire to reveal rich, glassy colors.
Tips & Variations
- Tip: Pipe slip lines neatly; these raised borders act as physical barriers that stop different glaze colors from running into each other.
- Variation: Keep the background pure cobalt blue with white raised floral patterns for a classic historic Talavera look.
Things to Avoid: Avoid using thin, watery underglazes that require too many coats; use high-pigment ceramic underglazes for rich color opacity. Do not apply clear top glaze too thick, or it will turn cloudy over dark colors.


16. Whimsical Mushroom Cap & Spore Gills Mug
What This Idea Means
Unlike the cottagecore red-capped design, this version focuses on the intriguing underside architecture of a mushroom—featuring delicate, fan-like sculpted gills wrapping around the base and underside of the mug.
How to Make It
- Forming the Vessel: Create a mug form that tapers slightly near the top and flares dramatically out at the bottom like an inverted mushroom cap.
- Carving Gills: Turn the mug upside down and use a sharp rib tool or fine carver to slice hundreds of closely spaced vertical gills around the bottom flare.
- Stalk Handle: Sculpt a smooth, stem-like handle that attaches from the flared base up to the rim.
- Glazing: Apply a warm ivory or cream glaze over the gills so it flows into the grooves, and paint the upper body in earthy beige or soft ochre tones.
Tips & Variations
- Tip: Use a soft-bristled brush to remove dry clay crumbs from carved gills before firing so they glaze smoothly.
- Variation: Paint tiny bioluminescent-style blue or green underglazes deep inside the gill grooves for an otherworldly fantasy look.
Things to Avoid: Avoid making the carved gills too deep, which can weaken the bottom wall structure of your mug. Ensure the bottom foot ring remains flat and clean of glaze so it stands level without rocking.
17. Storybook Gnome Village Mug
What This Idea Means
A charming, detailed mug that looks like a miniature gnome house carved from an old oak tree stump, complete with tiny wooden doors, stone windows, and a cobblestone base.
How to Make It
- Wood Grain Base: Texture the entire exterior of a cylindrical clay mug with bark textures using wire brushes and carving needles.
- Door & Windows: Sculpt a tiny arched wooden door with iron hinges and attach small round windows with stone frames on the front wall.
- Cobblestone Foot: Add small clay pebbles around the bottom foot ring to mimic a stone foundation.
- Glazing: Wash with dark umber stain, wiping back the excess to highlight wood grains. Underglaze the door red, hinges silver, and add tiny mossy green accents around the base.
Tips & Variations
- Tip: Keep all window and door details low-profile (flush against the mug body) so the mug remains easy to hold and pack away.
- Variation: Add a tiny sculpted gnome hat peaking out from over the rim as if someone is hiding inside.
Things to Avoid: Avoid making the bark texture so rough that it feels uncomfortable against your skin. Do not leave glaze inside the door hinge crevices, or the fine details will melt away into a smooth blob.
18. Whimsical Floating Cloud & Rainbow Mug
What This Idea Means
A dreamlike, cheerful mug featuring a cloud-shaped sculpted base and a rainbow handle that arcs gracefully from top to bottom, bringing instant joy to your morning drink.
How to Make It
- Cloud Base Sculpting: Sculpt soft, billowy cloud bulges around the lower third of the mug using smooth clay pinch techniques.
- Rainbow Handle: Extrude or roll three or four side-by-side clay coils. Bend them into a smooth arc and attach securely as the main handle.
- Underglaze Painting: Paint the handle coils in pastel pastel rainbow shades (soft pink, butter yellow, sky blue, mint). Glaze the clouds in fluffy white.
- Sky Body: Paint the main upper body of the mug in a soft, dreamy baby blue.
Tips & Variations
- Tip: Blend the rainbow handle joints thoroughly into the mug body, as multi-coil handles have more potential point stress splits.
- Variation: Use a dark midnight blue body with a iridescent pearl rainbow handle for a night-time dream aesthetic.
Things to Avoid: Avoid making the rainbow handle too thin or long, as long ceramic arcs tend to warp or sag during high-fire glaze firing. Keep cloud bumps smooth without deep pockets where liquid could get trapped during washing.
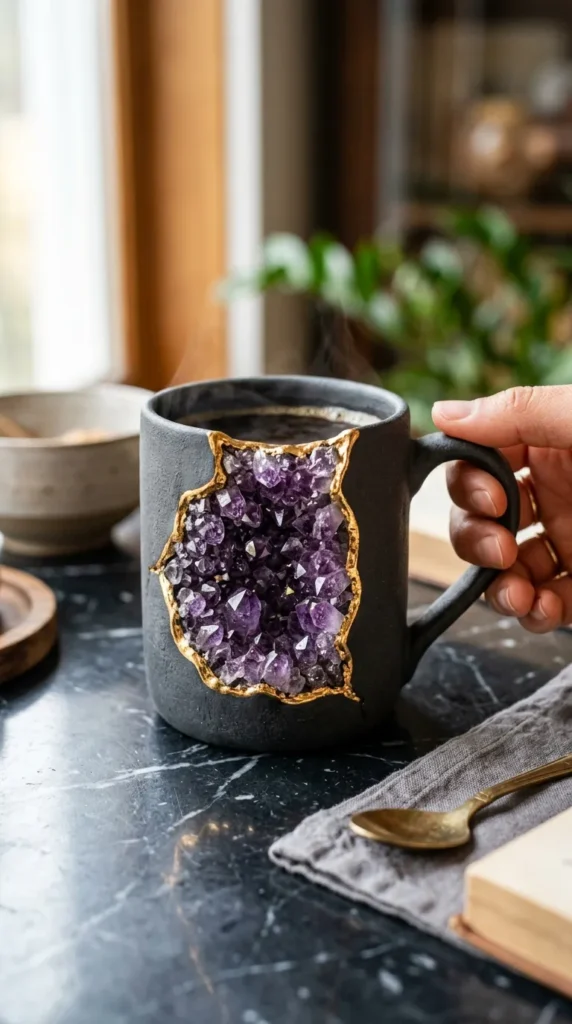
19. Enchanted Crystal Cluster Geode Mug
What This Idea Means
A dramatic, geological design where a “crack” or hollow cut-out on the mug reveals a sparkling cluster of hand-sculpted or crushed glass crystal points embedded deep within the side.
How to Make It
- Sculpting the Cavity: Push an indentation inward on one side of a thick-walled leather-hard clay mug to form an open geode pocket.
- Crystal Points: Sculpt tiny pointed clay crystals or place high-fire quartz-safe glass frit into the indented cavity.
- Outer Glaze: Coat the smooth exterior mug wall in a satin dark slate gray or rough basalt black glaze.
- Geode Glaze: Apply brilliant shimmering purple (amethyst), teal, or clear glaze over the inner crystal pocket.
Tips & Variations
- Tip: If using melted glass frit inside the geode pocket, test firing temperatures beforehand to ensure it doesn’t crack the surrounding clay body during cooling.
- Variation: Paint liquid bright gold or platinum luster along the outer rim of the geode crack for an opulent look.
Things to Avoid: Do not put raw, sharp crushed glass in areas that contact your hand or mouth; ensure all internal crystal points are smooth and melted safely into glaze. Never place geode pockets near the top drinking rim.
20. Playful Patchwork Quilt Ceramic Mug
What This Idea Means
Inspired by cozy folk-art textile quilts, this mug features carved grid squares filled with alternating floral, polka dot, and striped patterns, separated by sculpted clay stitch lines.
How to Make It
- Grid Carving: Gently map out an even grid pattern across the leather-hard ceramic body using a light stylus line.
- Stitch Lines: Use a small wheel tool or needle tool to poke small dashes along the grid lines, mimicking hand-sewn thread stitches.
- Pattern Painting: Carefully hand-paint different miniature folk-art patterns (gingham, stars, flowers, dots) into each square box using bright underglazes.
- Glaze Sealing: Dip in a clear glossy glaze to unify all the vibrant colors into a smooth, shiny finish.
Tips & Variations
- Tip: Use a fine-tip black underglaze applicator pen to trace over stitch dashes so the sewing details pop against the colorful tiles.
- Variation: Create a Halloween or spooky Frankenstein-style patchwork mug using neon greens, purples, and jagged black stitches.
Things to Avoid: Avoid rushing the underglaze detail work; muddy colors happen when underglazes bleed across squares. Avoid applying stitch details too deep, which can cause micro-cracks along grid lines during drying.